- DCEmu Network Home
- DCEmu Forums
- DCEmu Current Affairs
- Wraggys Beers Wines and Spirts Reviews
- DCEmu Theme Park News
- Gamer Wraggy 210
- Sega
- PSVita
- PSP
- PS4
- PS3
- PS2
- 3DS
- NDS
- N64
- Snes
- GBA
- GC
- Wii
- WiiU
- Open Source Handhelds
- Apple Android
- XBOX360
- XBOXONE
- Retro Homebrew & Console News
- DCEmu Reviews
- PC Gaming
- Chui Dev
- Submit News
- ContactUs/Advertise
Social Media |
|
Facebook DCEmu Theme Park News Wraggys Beers Wines and Spirits Youtube Wraggys Beers Wines and Spirits DCEmu Theme Park News Videos Gamer Wraggy 210 Wraggys Twitter |
Buy Xbox |
|
Xbox Original 
|
The DCEmu Homebrew & Gaming Network |
|
DCEmu Portal |
DCEmu Newcomers |
||||||||||
|
||||||||||
|
XBOX EVOLUTION
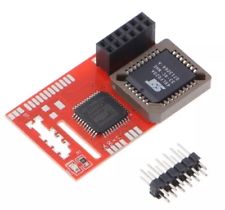
Matrix Tutorial From MoistFist @ ISOnews.com : I received 2 matrix chips yesterday and after installing both of them I realized that I might be able to help some people out. Yes, the information you need is all out there, but it's not all in one place and some things could definitely be clearer. In any case this is just what worked for me. I am sure there are plenty of bioses that would work equally well. If there is anything I missed or anything useful someone may want to add please feel free to add it. I hope this helps to keep the board from cluttering up with the same questions every other day. This tutorial will be written in a languague that even you can understand. Here's a list of items that will come in handy for your matrix installation: 1. Get the install instructions from the Xodus/Matrix site
or Easybuy2000 and print up 2. You will need 2 different sizes of Torx screwdrivers. I'm not sure exactly what size they are but they are very common sizes. Should be able to get them at Radioshack, Walmart, Sears etc... These will be used for taking off the top of the XBOX and for removing the dvd drive and hard drive. Also for screwing in the Matrix to the motherboard. 3. You will need a 9 volt battery. This is used for the programmer that comes with the Matrix. These are those rectangular batteries that hardly anyone uses anymore. You would be surprised to find how many people failed to flash their chip at first for lack of a battery. 4. A good source of light. You may need a flashlight, also, even a small magnifying lens is useful when aligning the chip. 5. Download "wmilk.exe" as per the installation instructions. Some people running Windows XP have reported that they needed to install a driver to get their flash to work. You can download "GiveIO Driver setup.exe" from http://www.roentdek.com/Software/SP-Main.htm 6. Have the bios you intend to use handy. I used the EvolutionX 2.4 bios. That one worked for me.
Do NOT use a cable and attach your programmer to the Xodus
while it is installed in the system, it will fry the programmer!
Always remove it. As I said I used the EvolutionX 2.4 bios (http://www.xtracerfilez.net/)
which was 1,024 KB I renamed it I used winhex to split the "evo24.rom" into 4 files each 256 KB. I took the last file and placed it in folder where the Wmilk.exe program was. WinHex renamed the 4 files so I had to rename it again.Again I only rename it so it's easier for me to keep track of. To split the file: Open WinHex, go to "file manager" and then the "split" option. Load up your .bin (or .rom) file and pick a folder to save the files that WinHex will make for you. Okay, now you have your wmilk.exe program and the bios of your choice in one folder. I found it easier to just make a folder on my c: drive and work with the stuff from there. For example: C:matrix since you have to use DOS commands it's easier to find your stuff there. I flashed my chip using Windows XP on an Athlon based system. I installed the GiveIO driver and rebooted. I don't know if that made any difference or not. I do know that on the first few tries I was getting errors and the flash didn't work until I rebooted, so don't forget to reboot! The programmer now has a freshly installed battery, the matrix chip is now attached to the programmer. Attach the programmer directly to your parallallel port. a solid red LED lights up on The Matrix. On your PC open up a dos prompt and go to the directory where your Wmilk.exe program is. In my case: c:matrix. type the command that appears on the installation instructions. In my case: wmilk -c -a ffc00000 -v -p evo24.rom and hit enter now you should see the program running: erasing The programming part went on for about 100 lines in my case, then I got a few lines of verifying ... and finally Programming complete.Verification complete. Some people keep getting errors, and some have said that they tried on 4 or 5 different systems before it finally worked. So the only thing I could suggest if you are having problems is to try the flashing on a different system. There is a program called "flashpack" on http://www.xtracerfilez.net (under PC applications) which is essentially an easier to use version of wmilk.exe (fewer commands). I tried Flashpack which uses the evolutionX 2.5 bios, but it did not work for me. You could also try installing the GiveIO drivers. Again, this is just what worked for me. Remove the programmer from the parallel port. Take the Matrix
off the programmer. It is now ready to install. Again, that's just me. Make sure the chip is in Mode 1 when first installing. Make sure you have your spacer in place. It's easier to align the Matrix using a magnifyng lens while looking straight down at the alignment holes. On my first try I got a blinking red light which means "bad alignment". I unscrewed it slightly and turned it just a hair to the right. Screwed it in again. Powered on the system and BINGO! green flashing light (good alignment). Don't forget to now set the mode to mode 2 "always on". I Put the drives back in but left the lid off the system (just in case) and hooked up my box to the TV. First tried an original, it booted perfectly. Good. Next tried a legal backup of a game I already own (right?).
Boots up perfectly. Great! I reopened the system and removed the chip, could not see anything wrong. Placed the chip again, again a green light. Tested backups again and Bam! they all work. I'm only saying that it appears that it is possible to get a "false positive" when aligning The Matrix. That is, you get a green light but the chip is just ever so slightly misaligned. If this happens to you, you might try removing the chip,
reinstalling and then slighty tweaking the chip here and there.
You can twist it a little to the left or right and still get
a green light. Keep trying and good luck!!! The Hottest DCEmu Posters |


